Changing the way you think
We want to get to the point that we can change the way we think
We want to get to the point that we can change the way we think
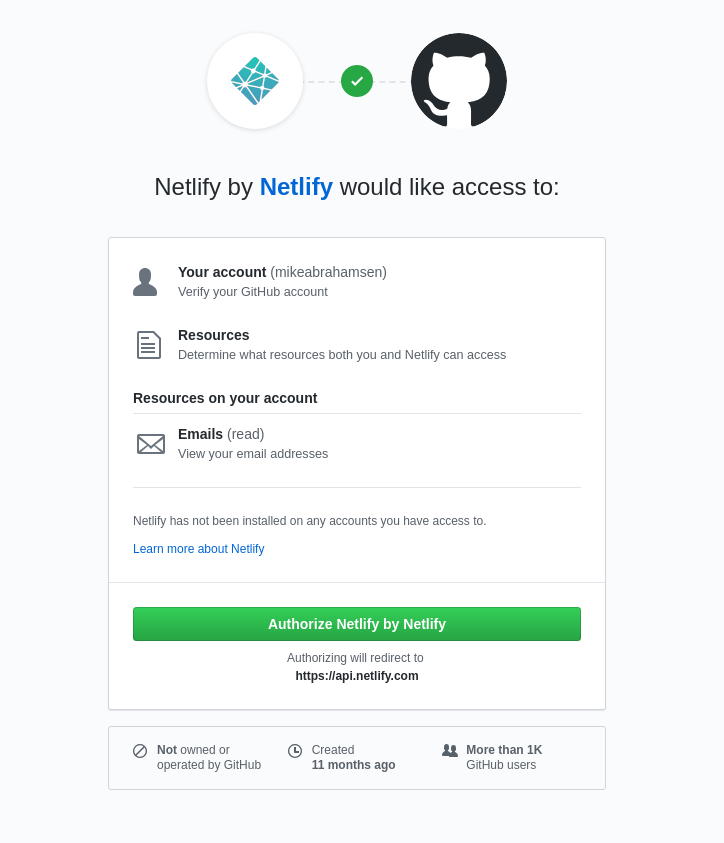
Github apps on the rise
Now with a few lines of code we can create a flask application to install our new Github Application. (Yes, this is all the code you need)
# app.py

from flask import Flask, request, jsonify

app = Flask(__name__)

GITHUB_INSTALL_URL = "https://github.com/apps/<Github-App-Name>/installations/new"

@app.route('/')
def index():
    return f"<h1>Github Apps with Flask</h1></br> <a href='{GITHUB_INSTALL_URL}'>Install app</a>"

if __name__ == "__main__":
    app.run()

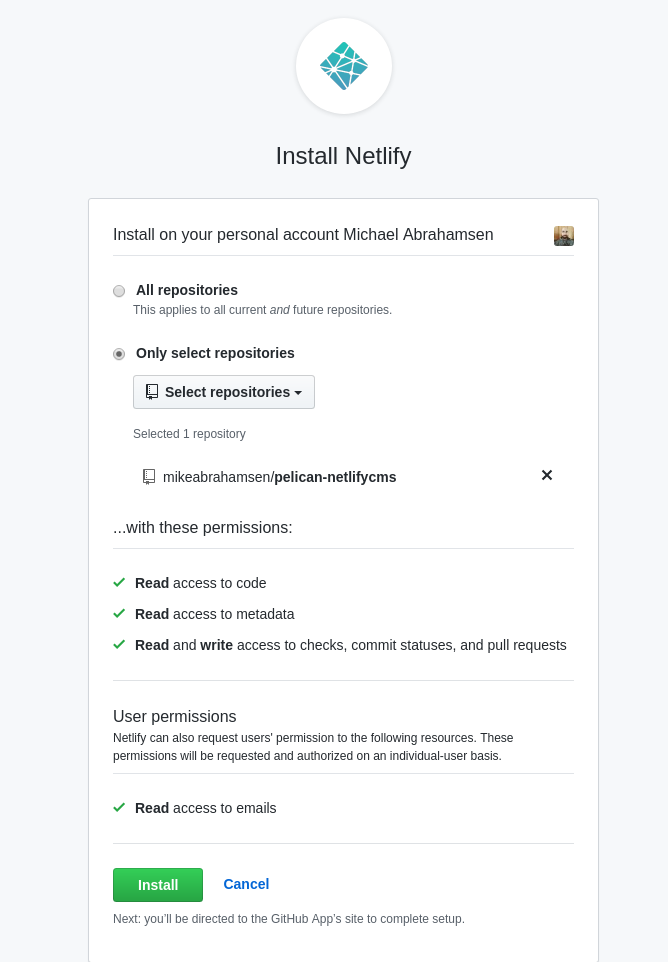
Using a Github app is the preferred way integrate with Github. By creating a Github app you can give your users more granular control of what you have access to. By transitioning Conveyor.dev to use a Github app the level of permissions that must be granted are much lower. For instance, when using an Oauth App with Github if you wanted to be able to read the contents of a repository you would need to ask for Read/Write permissions to every public and private repo for that user. With a Github App you can get Read-Only permission to select repositories.
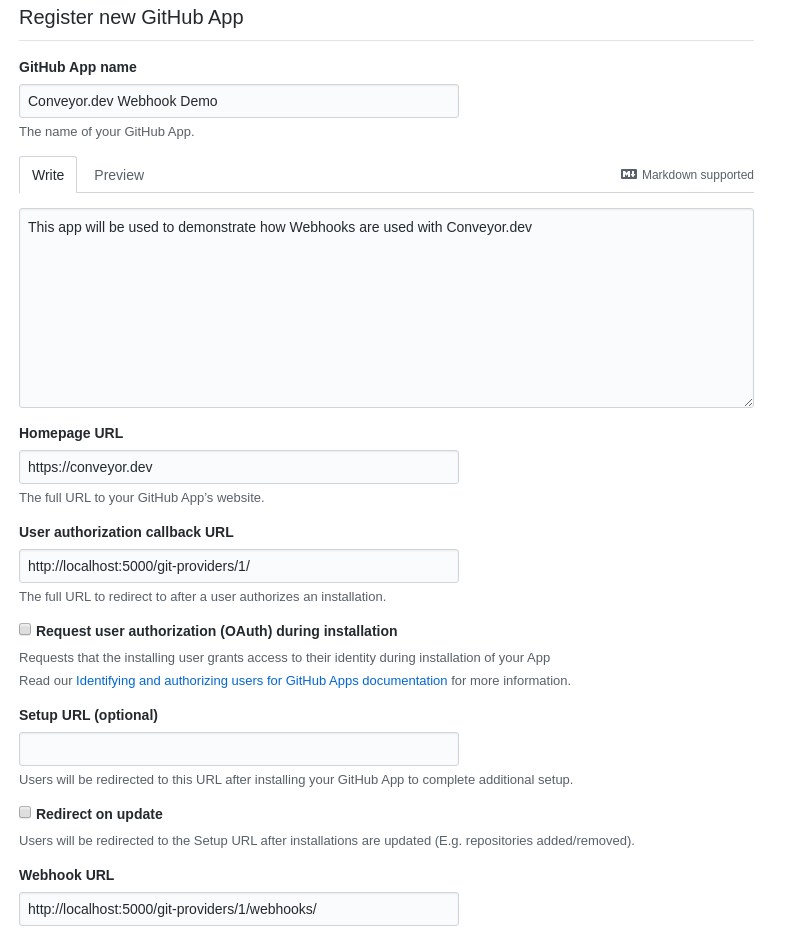
To get started head over to the Github Apps page and click the New Github App button.
To register a Github app fill out a few details:
Now start your flask server with the flask run command and navigate to
http://localhost:5000 and click on the Install app link to install the
Github application to your account

With that you now have your Github App installed on your account with access to the repo(s) that you selected.
Receiving webhook events and authenticating will be covered in the future.
The simple form of this macro looks like this:
# app/templates/macros.html

{% macro build_site_navigation(pages, selected) %}
<div class="w-1/4 mr-8">
    <ul>
        {% for page in pages %}
        <a href="{{page.url}}">
            <li>{{page.name}}</li>
        </a>
        {% endfor %}
    </ul>
</div>
{% endmacro %}
To use this macro in our template:
{% import "macros.html" as macros %} at the top of the template file{{macros.build_site_navigation(pages=pages, selected="Site Details")}}To populate the links in the sidebar I created a function generate_page_list
and then pass pages into the template
# app/routes.py

def generate_page_list(server_id, site_id):
    pages = [
        {"name": "Site Details", "url": url_for(
            "sites.show", server_id=server_id,
            site_id=site_id)
         },
        {"name": "Environment", "url": url_for(
            "sites.environment_page", server_id=server_id, site_id=site_id)
         },
        {"name": "SSL", "url": url_for(
            "sites.ssl_page", server_id=server_id,
            site_id=site_id)
         },
        {"name": "NGINX Config", "url": url_for(
            "sites.nginx_config_page", server_id=server_id,
            site_id=site_id)
         },
        {"name": "Workers", "url": url_for(
            "sites.workers_page", server_id=server_id,
            site_id=site_id)
         }
    ]
    return pages
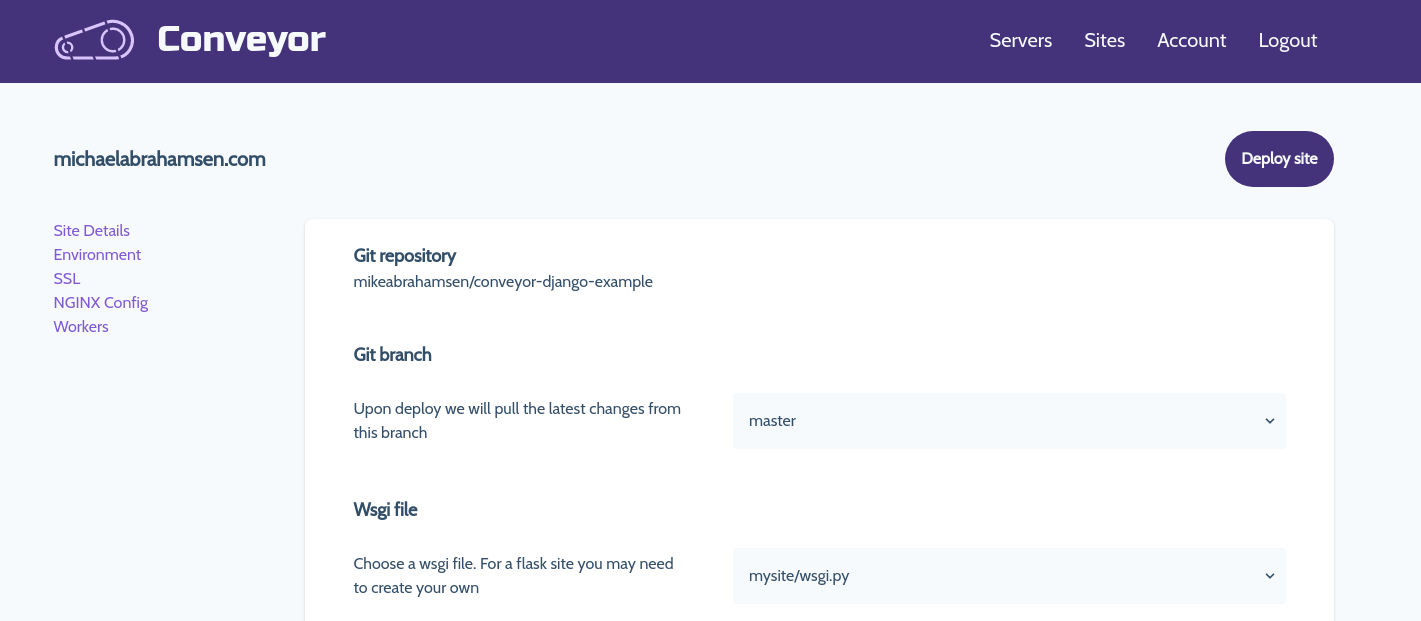
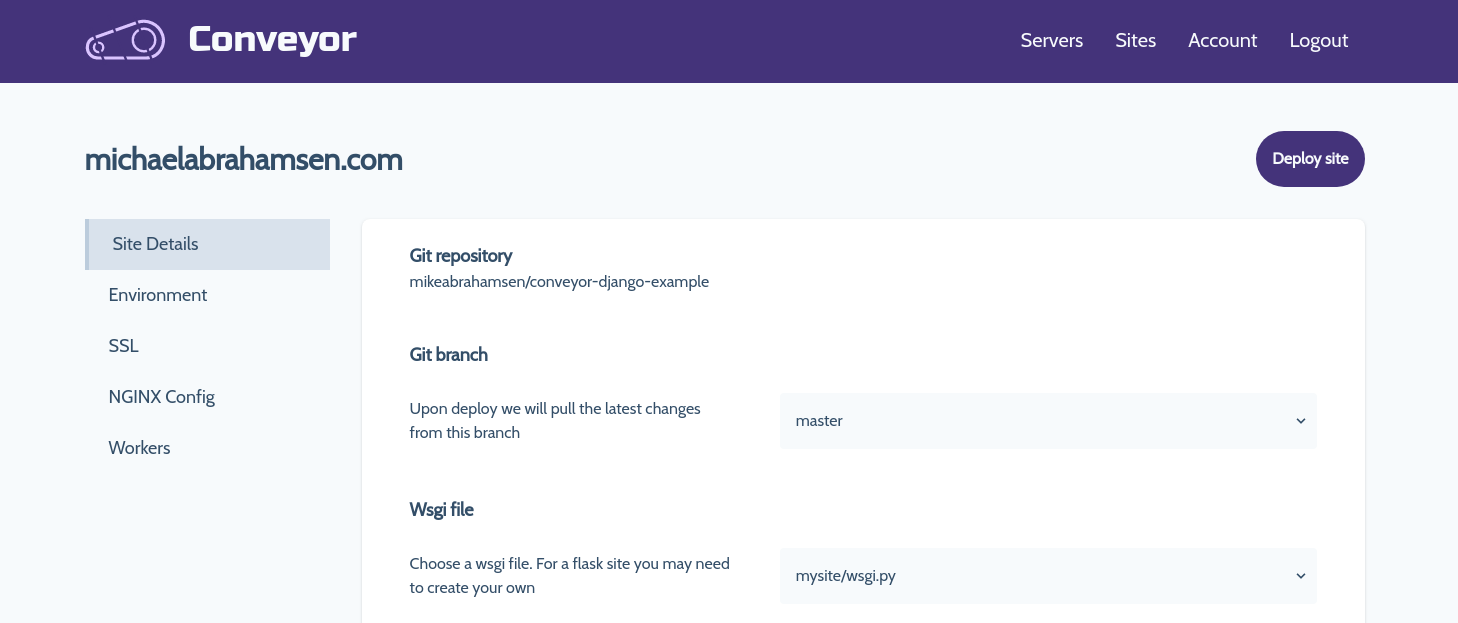
So the sidebar is now functioning but it needs some styles. Let's improve the macro a little bit to include styling with tailwindcss
# app/templates/macros.html

{% macro build_site_navigation(pages, selected) %}
<div class="w-1/4 mr-8">
    <ul>
        {% for page in pages %}
        <a href="{{page.url}}">
            <li class="text-lg pl-6 py-3 {% if selected == page.name %}border-l-4 bg-gray-200{% endif %}">{{page.name}}</li>
        </a>
        {% endfor %}
    </ul>
</div>
{% endmacro %}
Now we are getting somewhere, here's an updated view
To make this fully functional some code changes must be made with the current routes. Previously the only route that was necessary to show this looked like this:
# app/routes.py

@app.route('servers/<int:server_id>/sites/<int:site_id>', methods=['GET'])
def show(server_id, site_id):
    ...
To support all of our new routes for the sidebar we are going to add a few more:
# app/routes.py

# this will now show the site details by default
@app.route('servers/<int:server_id>/sites/<int:site_id>', methods=['GET'])

# additional routes for new views
@app.route('servers/<int:server_id>/sites/<int:site_id>/environment', methods=['GET'])
@app.route('servers/<int:server_id>/sites/<int:site_id>/ssl', methods=['GET'])
@app.route('servers/<int:server_id>/sites/<int:site_id>/nginx', methods=['GET'])
@app.route('servers/<int:server_id>/sites/<int:site_id>/workers', methods=['GET'])
Everything was previosly held within a single template file, now we need to create a separate template file for each view
# the following files were created and their html was transfered from the
# original template file into their own

app/templates/site/details.html
app/templates/site/environment.html
app/templates/site/ssl.html
app/templates/site/nginx.html
app/templates/site/workers.html
Visit conveyor.dev to apply.
Install the requirements and run the pelican-quickstart command, following the prompts:
$ pip install -r requirements.txt
$ pelican-quickstart
$ mkdir pelican-netlify-cms && cd $_

# create and activate a virtual environment for your project, for example:
$ python -m venv venv
$ source venv/bin/activate
Create a requirements.txt file. This is important as Netlify will look for this file to determine dependencies. In the file:
pelican
markdown
Now assuming you have created an empty repo on Github, we will add this project to that repo.
$ git init
$ git add .
$ git commit -m 'initial commit'
$ git remote add origin Your_Own_Git_Repository_URL
For example, content/2019-04-20-sample.md
---
Title: My First Post
Date: 2019-04-20 05:30
Category: example
---

Post content
Push the post to Github
$ git add .
$ git push
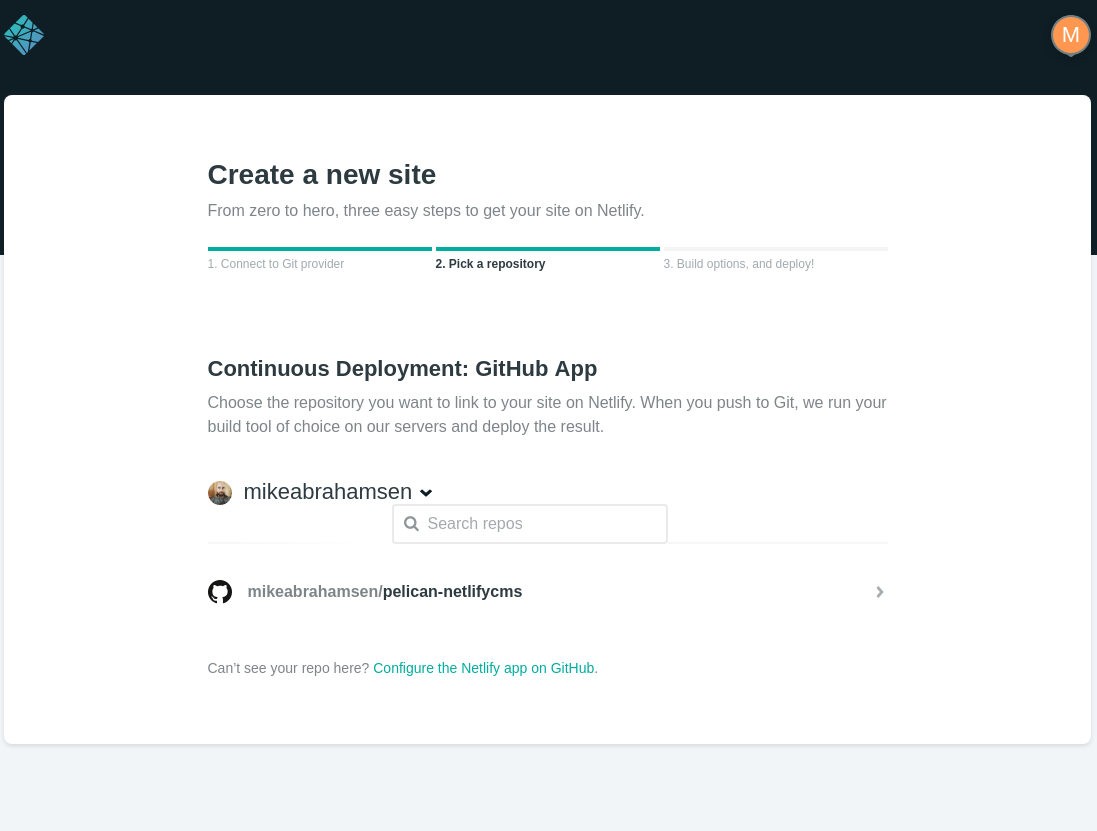
Connect to Github
Choose the repositories that Netlify will have access to.
Now choose the repository to publish.
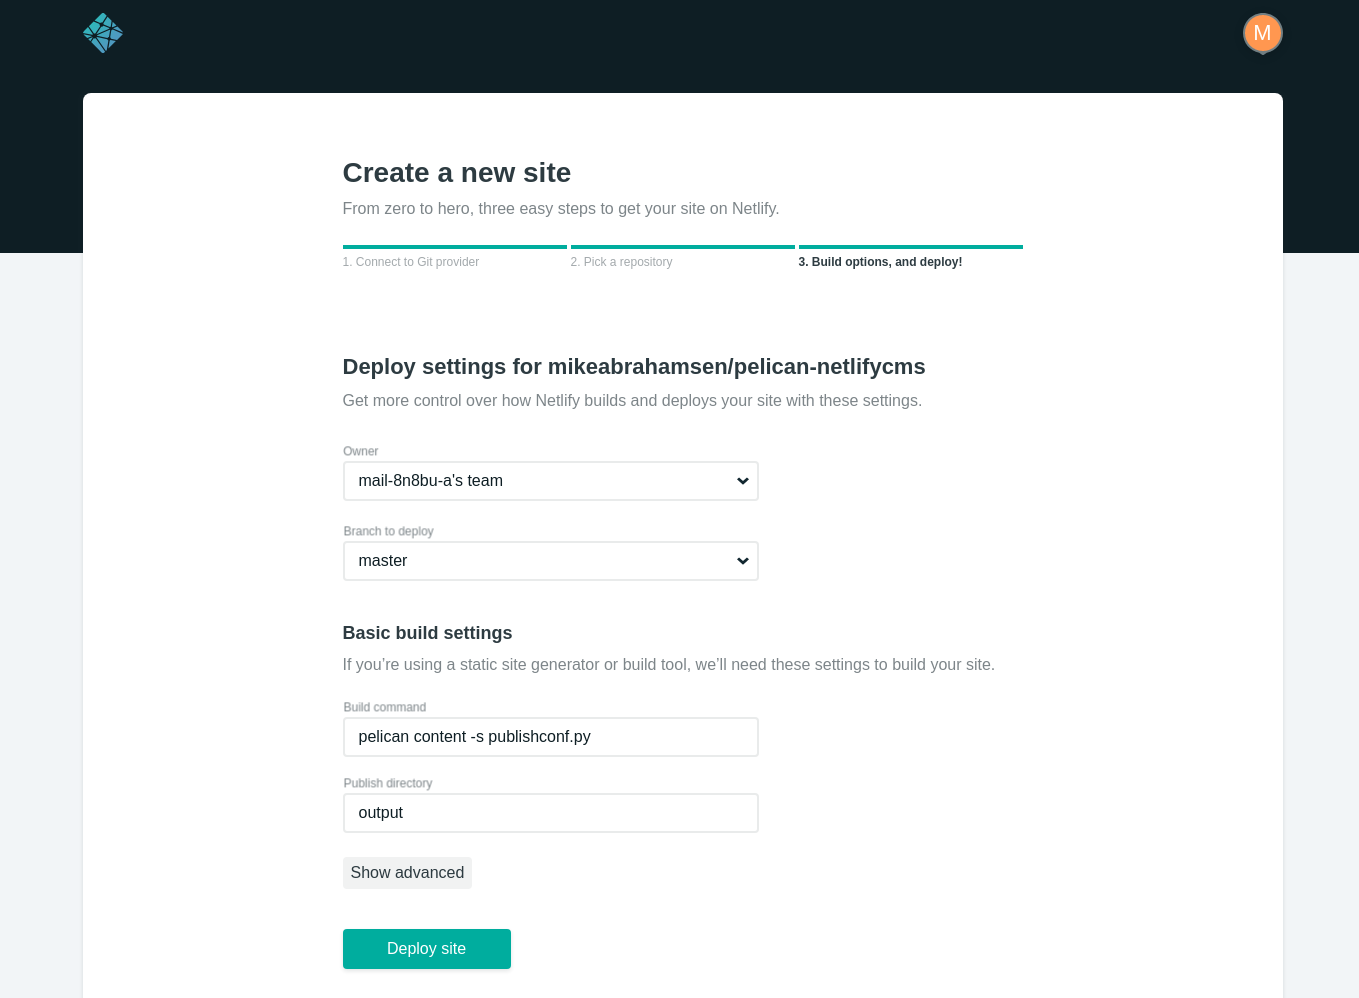
Add the build command and output folder.
pelican content -s publishconf.py
output
[Unit]
Description=Starts i3lock at suspend time
Before=suspend.target

[Service]
User=username
Type=forking
Environment=DISPLAY=:0
ExecStartPre=
ExecStart=/usr/local/bin/lock_and_blur.sh

[Install]
WantedBy=suspend.target
You may want your computer to lock on sleep (for example if you are using hybrid-sleep ) In that case modify the above script to look like this: See Creating a custom lockscreen with i3lock to setup the lockscreen script
Create a file /etc/systemd/system/screenlock@.service with the following
contents. (Change the username to be your local user account name)
[Unit]
Description=Starts i3lock on sleep
Before=sleep.target

[Service]
User=username
Type=forking
Environment=DISPLAY=:0
ExecStartPre=
ExecStart=/usr/local/bin/lock_and_blur.sh

[Install]
WantedBy=sleep.target
Enable the service by running:
sudo systemctl enable screenlock@username.service again replacing username with the linux account username
Instead of the default i3 lockscreen (which is just a plain white screen), you can show an image as the background. You can create a script to show a blurred image of the content on your screen to get the following effect.
The short script below will take a screenshot of your screen, blur it, and add the lock icon:
Create the file at /usr/local/bin/lock_and_blur.sh
#!/usr/bin/env bash

# set the icon and a temporary location for the screenshot to be stored
icon="$HOME/images/lock-icon-light.png"
tmpbg='/tmp/screen.png'

# take a screenshot
scrot "$tmpbg"

# blur the screenshot by resizing and scaling back up
convert "$tmpbg" -filter Gaussian -thumbnail 20% -sample 500% "$tmpbg"

# overlay the icon onto the screenshot
convert "$tmpbg" "$icon" -gravity center -composite "$tmpbg"

# lock the screen with the blurred screenshot
i3lock -i "$tmpbg"
You can use the package xautolock to lock the screen after a specific amount of time. To configure, add the following to your i3 config file. This will lock the screen after 5 minutes and give you a warning 30 seconds before the screen locks. You will need notify-osd installed to show the notification.
exec xautolock -detectsleep -time 5 -locker "/usr/local/bin/lock_and_blur.sh" \
  -notify 30 \
  -notifier "notify-send -u critical -t 10000 -- 'locking screen in 30 seconds'"
To go a little bit further you can use a package called i3lock-color to customize the color of the feedback ring. The next step is to detect if the background is dark or light and change the lock icon and colors based on that. The final script will look like this:
#!/usr/bin/env bash

lighticon="$HOME/images/lock-icon-light.png"
darkicon="$HOME/images/lock-icon-dark.png"
tmpbg='/tmp/screen.png'

# take a screenshot
scrot "$tmpbg"

# set a threshold value to determine if we should use the light icon or dark
# icon
VALUE="60" #brightness value to compare to

# determine the color of the screenshot
# thanks to [i3lock-fancy](https://github.com/meskarune/i3lock-fancy) for the
# idea of getting the background color to change the icons
COLOR=$(convert "$tmpbg" -gravity center -crop 100x100+0+0 +repage -colorspace hsb \
    -resize 1x1 txt:- | awk -F '[%$]' 'NR==2{gsub(",",""); printf "%.0f\n", $(NF-1)}');

# change the color ring colors to leave the middle of the feedback ring
# transparent and the outside to use either dark or light colors based on the
# screenshot
if [ "$COLOR" -gt "$VALUE" ]; then #light background, use dark icon
    icon="$darkicon"
    PARAM=(--textcolor=00000000 --insidecolor=00000000 --ringcolor=0000003e \
        --linecolor=00000000 --keyhlcolor=ffffff80 --ringvercolor=ffffff00 \
        --separatorcolor=22222260 --insidevercolor=ffffff1c \
        --ringwrongcolor=ffffff55 --insidewrongcolor=ffffff1c)
else # dark background so use the light icon
    icon="$lighticon"
    PARAM=(--textcolor=ffffff00 --insidecolor=ffffff00 --ringcolor=ffffff3e \
        --linecolor=ffffff00 --keyhlcolor=00000080 --ringvercolor=00000000 \
        --separatorcolor=22222260 --insidevercolor=0000001c \
        --ringwrongcolor=00000055 --insidewrongcolor=0000001c)
fi

# blur the screenshot by resizing and scaling back up
convert "$tmpbg" -filter Gaussian -thumbnail 20% -sample 500% "$tmpbg"

# overlay the icon onto the screenshot
convert "$tmpbg" "$icon" -gravity center -composite "$tmpbg"

# lock the screen with the color parameters
i3lock "${PARAM[@]}" -i "$tmpbg"
A simple way to check the data integrity of a ZFS pool is by scrubbing the data. This process goes through all of the data and ensures it can be read.
To start a scrub you can run the command:
$ zpool scrub <pool>
If you would like to stop a scrub that is currently in progress (if you are doing some other heavy i/o work for instance) run the following command:
$ zpool scrub -s <pool>
Scrubbing should happen at least once a week. Here are a couple ways to easily schedule a scrub.
Set up a cronjob to run a scrub once a week:
$ crontab -e
------------
...
30 19 * * 5 zpool scrub <pool>
...
Alternativly use systemd-zpool-scrub from the AUR if you are on Arch Linux Once installed it will create a service file that will run a scrub weekly, all you need to do is enable the service.
$ systemctl enable zpool-scrub@<pool>.timer
$ systemctl start zpool-scrub@<pool>.timer
$ ssh-keygen -t rsa -b 4096 -f "$HOME/.ssh/masecondgit_rsa
Create a file at ~/.ssh/config
# create the first host to use your original key as default
Host github.com
    IdentityFile ~/.ssh/id_rsa
    HostName github.com
    User mikeabrahamsen

# create a second host to use with the second github account
Host github.com-secondgit
    HostName github.com
    User mikeabrahamsen
    IdentityFile ~/.ssh/masecondgit_rsa
Now to use the second account with the ssh key use the following when you clone:
# notice the '-secondgit' before the ':'
git clone git@github.com-secondgit:mikeabrahamsen/dotfiles.git
If you want to add this to an already created repo
git remote add origin git@github.com-secondgit:mikeabrahamsen/dotfiles.git
While I have tried to use my window manager i3 for creating workspaces for development workflow, I just have not been able to find a completely comfortable solution. There is something about switching between terminals and vim through i3 that I did not find as convenient as my tmux setup so I have stuck with tmux for a long time.
I've been a big fan of tmux in my development workflow for years, it's been great for moving between the editor and terminal. While I understand there are many other features of tmux, my typical use case was only to use the windows and panes and take advantage of the numbered windows to switch between tasks. Usually my tmux workflow will involve three windows:
When I switched to neovim recently my use of tmux changed. First, there was an annoying little bug with neovim and tmux which caused changing between splits very annoying. Then I started using neovim's terminal emulator which really changed the way tmux was integrated with my workflow. Opening a terminal as a buffer in neovim became the new standard. While the setup was not perfect tmux was being used less as I used neovim more.
My current neovim setup looks like this:
On the bottom right is an example of how the terminal integrates seemlessly into neovim splits.
Change the hotkey to get out of insert mode. By default the hotkey to enter
normal mode is Ctr+\ Ctr+n. I changed that to 'jj' with the following code in my
.config/nvim/init.vim. Note: I used jj as opposed to escape to not create
issues when opening a nvim window inside of a neovim terminal, such as doing a
git commit.
tnoremap jj <C-\><C-n>
Automatically enter insert mode when a terminal is selected
:au BufEnter * if &buftype == 'terminal' | :startinsert | endif
Use fzf to search buffers for easy file and terminal switching
function! s:buflist()
  redir => ls
  silent ls
  redir END
  return split(ls, '\n')
endfunction

function! s:bufopen(e)
  execute 'buffer' matchstr(a:e, '^[ 0-9]*')
endfunction

nnoremap <silent> <Leader>b :call fzf#run({
\   'source':  reverse(<sid>buflist()),
\   'sink':    function('<sid>bufopen'),
\   'options': '+m',
\   'down':    len(<sid>buflist()) + 2
\ })<CR>
Rename buffers for easier searching. By default the terminal buffer titles will
be named in a way that does not easily allow you to search for them by name
(example: term://.//15645:/usr/bin/zsh).
There are a couple ways to get over this, you can invoke the terminal command
with a comment to create a logical name:
:term zsh \# PythonDevServer
:terminal zsh \# PythonDevServer
Alternatively you can rename the buffer with the :file command
:file PythonDevServer
I prefer using the :term zsh \# foo option as it allows me to easily see the
buffer is a terminal as the name will read term://.//15645:/zsh # PythonDevServer
This allows me to open the fzf search with
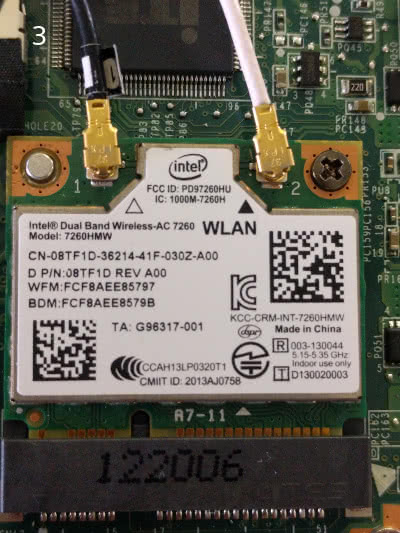
The Lenovo Ideapad u310 has been plagued with terrible wifi issues. There was even a class action settlement for it. Upgrading the WLAN card, while a reasonable solution, is not as easy as opening up the laptop and putting a new card in. Lenovo has locked the computer from using any other WLAN cards in the BIOS. To get around this, you can flash the bios with a version that has been modified with the WLAN whitelist removed.
To do this, you need a copy of modified bios file found here and a usb drive to boot from.
It is highly recommended to make a backup of your BIOS before flashing the modified BIOS to your computer. It's also possible this method may result in losing the OEM Windows license that was embedded in the BIOS. I don't use Windows so this wasn't much of a concern for me. I did boot into Windows after flashing the BIOS to check and the license still seemed to work, YMMV.
To update the bios you need to created a bootable DOS usb. On Windows you can use a utility called Rufus and follow the instructions here. If you are using Linux you can check out resources from the Flashing BIOS from Linux page on the Arch Wiki
Once you have your USB created you can flash the BIOS and install the WLAN card with the following steps:
flash.bat from the command line and wait for the BIOS
install to finish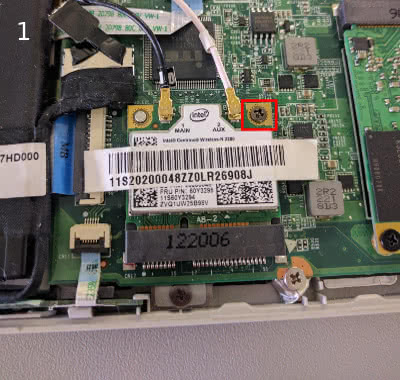

The last setup of this machine was an UNRAID install with virtual machines using PCI passthrough. For this setup I am going to run Arch Linux with a root install on ZFS. The root install will allow snapshots of the entire operating system.
The completed setup will have the following zpool configuration and mount points
$ zpool status

  pool: vault
 state: ONLINE
  scan: none requested
config:

    NAME                                             STATE     READ WRITE CKSUM
    vault                                            ONLINE       0     0     0
      mirror-0                                       ONLINE       0     0     0
        ata-ST3000DM001-1CH144_Z1F5W372              ONLINE       0     0     0
        ata-ST3000DM001-1CH144_Z1F5YJ5C              ONLINE       0     0     0
        ata-ST3000DM001-1C6144_Z1F5KYV4              ONLINE       0     0     0
    cache
      ata-Samsung_SSD_850_EVO_120GB_S21TNSAG205110A  ONLINE       0     0     0
      ata-Samsung_SSD_850_EVO_120GB_S21WNX0H404232B  ONLINE       0     0     0

errors: No known data errors
$ zfs mount

vault/ROOT/default              /
vault/home                      /home
vault                           /vault
Boot into archlive in UEFI mode and create a 512MB EFI partition on the USB drive
# enter into fdisk for the required device
$ fdisk /dev/sdX
$ g # create a new GPT partition table
$ n # create a new partition
$ enter # select partition 1 as default
$ enter # select default start location
$ +512M # end location of 512M after start location

$ t # change the partition type to EFI
$ 0 # in fdisk the EFI system partition is 0
$ w # write changes to disk
You do not need to partition the disks that will be used in the pool as zfs will
partition the drives automatically when the pool is created.
Use disk id to specify the disks in the pool. You can find disk ids with the
command ls /dev/disk/by-id. This install is going to use a 3 way mirror with
the SSDs acting as the cache.
Load the kernel module
$ modprobe zfs
Note the -o ashift=12 will use 4096 byte sectors which is what you want
for modern disks.
$ zpool create -f -o ashift=12 vault mirror \
ata-ST3000DM001-1CH144_Z1F5W372 \
ata-ST3000DM001-1CH144_Z1F5YJ5C \
ata-ST3000DM001-1C6144_Z1F5KYV4 \
cache \
ata-Samsung_SSD_850_EVO_120GB_S21TNSAG205110A \
ata-Samsung_SSD_850_EVO_120GB_S21WNX0H404232B
Check the status of the pool to make sure it was created correctly.
$ zpool status

  pool: vault
 state: ONLINE
  scan: none requested
config:

    NAME                                             STATE     READ WRITE CKSUM
    vault                                            ONLINE       0     0     0
      mirror-0                                       ONLINE       0     0     0
        ata-ST3000DM001-1CH144_Z1F5W372              ONLINE       0     0     0
        ata-ST3000DM001-1CH144_Z1F5YJ5C              ONLINE       0     0     0
        ata-ST3000DM001-1C6144_Z1F5KYV4              ONLINE       0     0     0
    cache
      ata-Samsung_SSD_850_EVO_120GB_S21TNSAG205110A  ONLINE       0     0     0
      ata-Samsung_SSD_850_EVO_120GB_S21WNX0H404232B  ONLINE       0     0     0

errors: No known data errors
Turn on compression and optimize writes to disk with relatime
#turn on compression
$ zfs set compression=on vault
# optimize writes to disk
$ zfs set relatime=on vault
Create datasets for / and home
$ zfs create -o mountpoint=/ vault/ROOT/default
$ zfs create -o mountpoint=/home vault/home
Specify the dataset that will be used to boot from
$ zpool set bootfs=vault/ROOT/default vault
Unmount zfs volumes and export before installing arch
$ zfs umount -a
$ zpool export vault
Create directories for mountpoints
$ mkdir /mnt/{boot,home}
Mount zfs and boot volumes
$ mount /dev/sdX1 /mnt/boot # boot disk
$ zpool import -d /dev/disk/by-id -R /mnt vault
$ pacstrap -i /mnt base base-devel
Copy the zpool.cache file to the arch install
$ cp /etc/zfs/zpool.cache /mnt/etc/zfs/zpool.cache
Generate the fstab and make sure /boot is mounted
$ genfstab -U -p /mnt >> /mnt/etc/fstab
Add hooks to mkinitcpio.conf and regenerate it
$ vim /mnt/etc/mkinitcpio.conf

# Add zfs after keyboard but before filesystems
HOOKS="base udev autodetect modconf block keyboard zfs filesystems"


# regenerate mkinitcpio
$ mkinitcpio -p linux
$ arch-chroot /mnt /bin/bash
Add the archzfs repo to /etc/pacman.conf
$ vim /etc/pacman.conf

# add the following in the repository section
[archzfs]
Server = http://archzfs.com/$repo/x86_64
Sign the repository key with the key from AUR
$ pacman-key -r 5E1ABF240EE7A126
$ pacman-key --lsign-key 5E1ABF240EE7A126
Update the system and install zfs
$ pacman -Syyu
$ pacman -S zfs-linux
Enable zfs services
$ systemctl enable zfs.target
$ systemctl enable zfs-import-cache.service
Install the EFI bootloader
bootctl --path=/boot install
Create an entry for Arch in the bootloader
$ vim /boot/loader/entries/arch.conf

# add the following
title     Arch Linux
linux     /vmlinuz-linux
initrd    /initramfs-linux.img
options   zfs=vault/ROOT/default rw
Exit chroot unmount drives and restart
# exit chroot before unmounting
$ umount /mnt/boot
$ zfs umount -a
$ zpool export vault
$ reboot
Apparently when the computer is booting the host id is not available to the system. To fix this, create a hostid file and regenerate mkinitcpio. After rebooting:
$ hostid > /etc/hostid
$ mkinitcpio -p linux
Adding ZFS to the iso can save you some time when you are experimenting with the setup as you will not have to add the repository and install each time you restart the machine this way.
# switch to root
$ sudo -i or su root

# Install archiso
$ pacman -S archiso

# Create directory to hold our build and copy necessary files
$ mkdir ~/archlive
$ cp -r /usr/share/archiso/configs/releng/* ~/archlive
Edit ~/archlive/pacman.conf and add the following code:
[archzfs]
SigLevel = Optional TrustAll
Server = http://archzfs.com/$repo/x86_64
$ echo 'archzfs-linux' >> ~/archlive/packages.x86_64
# create a temporary directory for the build
$ cp -r ~/archlive /tmp
$ cd /tmp/archlive

# Create /tmp/archlive/out and run the build script
$ mkdir out
$ ./build.sh -v
Uselsblk to find the usb in my case /dev/sdc use /dev/sdX to fit your
needs. Then run the following command to create the bootable usb:
$ dd bs=4M if=/tmp/archlive/out/archlinux-2017.03.05-dual.iso of=/dev/sdX
status=progress && sync
I recently started using Less Css with Django, after using it briefly I found that I did not want to manually compile Less after making changes during development. Using this approach I am able to compile Less client-side during development and have django-compressor compile server-side on live site.
# Using arch linux
sudo pacman -S npm
sudo npm install -g less

# Other distribution
sudo apt-get install npm
sudo npm install -g less
pip install django-compressor
INSTALLED_APPS = (
# other installed apps
'compressor',
COMPRESS_PRECOMPILERS = (
    ('text/less', 'lessc {infile} {outfile}'),
)
STATICFILES_FINDERS = (
# other static files finder
'compressor.finders.CompressorFinder',
)
There are many ways to set this up. A simple, yet effective way is to compile less client-side when debugging and server-side during production. To do this we need to do the following:
{% load staticfiles %}
{% load compress %}
<!DOCTYPE html>
<html>
<head>
    {% if debug %}
    <link rel="stylesheet" type="text/less" media="all" href="{% static 'less/theme.less' %}" />
    <script src="{% static 'js/less-1.6.1.min.js' %}"></script>
    {% else %}
    {% compress css %}
    <link rel="stylesheet" type="text/less" media="all" href="{% static 'less/theme.less' %}" />
    {% endcompress %}
    {% endif %}
</head>
I was recently adding a slug field to a model in a Django application when I ran into this error when doing the South migration:
Error in migration: test_app:0002_auto__add_field_category_slug
DatabaseError: table "_south_new_test_app_category" already exists
When South makes changes to an existing table, it creates a new
table with a temporary name. The table is named
"_south_new_" + table_name. In this case, the new table name is _south_new_test_app_category.
Assuming the changes are successful, the old table is deleted and replaced with the new table.
However, the previous migration failed and the temporary table still existed.
To fix this, we need to drop the temporary table and redo the migration.
If you are not familiar with dropping a table, you can run the sqlclear
command to get a list of the drop table sql statements for an app. For
this test app it looks like this:
> python manage.py sqlclear test_app

BEGIN;
DROP TABLE "test_app_person";
DROP TABLE "test_app_category";
DROP TABLE "test_app_organization";
DROP TABLE "_south_new_test_app_category";

COMMIT;
Using the syntax you see from sqlclear you can run the dbshell command and drop temporary table.
> python manage.py dbshell

sqlite> DROP TABLE "_south_new_test_app_category";
Now as long as you fixed the issue with the migration that failed, you can run the migration again and it will work as planned.
Setting up the DXL335 triple axis accelerometer is pretty straight forward. First I soldered 6 straight breakaway headers into the ADXL335 in order to easily plug the breakout board directly into the analog pins in the Arduino.
Once soldered I plugged the accelerometer in to the following pins:
| Breakout Pin | Analog Pin |
|---|---|
| Self-Test | 0 |
| Z-Axis | 1 |
| Y-Axis | 2 |
| X-Axis | 3 |
| Ground | 4 |
| VCC | 5 |
Once the accelerometer was in place it was time to test.
    /*
    This short program reads data from the  ADXL335 axis accelerometer
    */
    const int groundpin = 18;             // analog input pin 4 -- ground
    const int powerpin = 19;              // analog input pin 5 -- voltage
    const int xpin = A3;                  // x-axis of the accelerometer
    const int ypin = A2;                  // y-axis
    const int zpin = A1;                  // z-axis

    const String XHEADER = "X: ";
    const String YHEADER = "Y: ";
    const String ZHEADER = "Z: ";
    const String TAB = "\t";

    void setup()
    {
        // initialize the serial communications:
        Serial.begin(9600);
        // Power and ground the necessary pins. Providing power to both
        // the analog and digital pins allow me to just use the breakout
        // board and not have to use the normal 5V and GND pins
        pinMode(groundpin, OUTPUT);
        pinMode(powerpin, OUTPUT);
        digitalWrite(groundpin, LOW);
        digitalWrite(powerpin, HIGH);
    }

    void loop()
    {
        // print values that are recieved from the sensors and put a tab between
        // the values
        Serial.print(XHEADER + analogRead(xpin) + TAB);
        Serial.print(YHEADER + analogRead(ypin) + TAB);
        Serial.print(ZHEADER + analogRead(zpin));
        Serial.println();
        delay(200);
    }
Using this code I was able to get the following output from the board when it was set on a flat surface:
X: 500 Y: 512 Z: 594
These values will represent the baseline for detecting movement.
I have been using the site 750words.com for a while now and have come to really enjoy using it. At first I had a little trouble navigating the site and the links didn’t seem very intuitive. However, I caught on fast and have no trouble getting around the site as needed. The site is based around the idea of writing 750 words everyday, called “Morning Pages” this exercise is meant to allow you to clear your head and allow new ideas to start flowing.
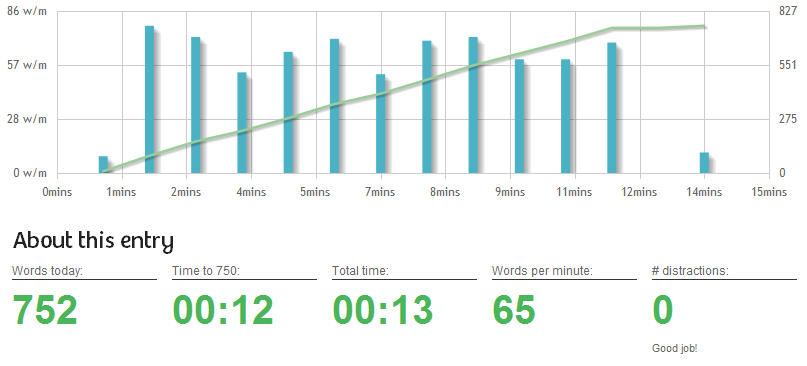
This graph shows your typing speed as you work your way up to 750 words.
You can monitor your typing skill over time by looking back at these graph.
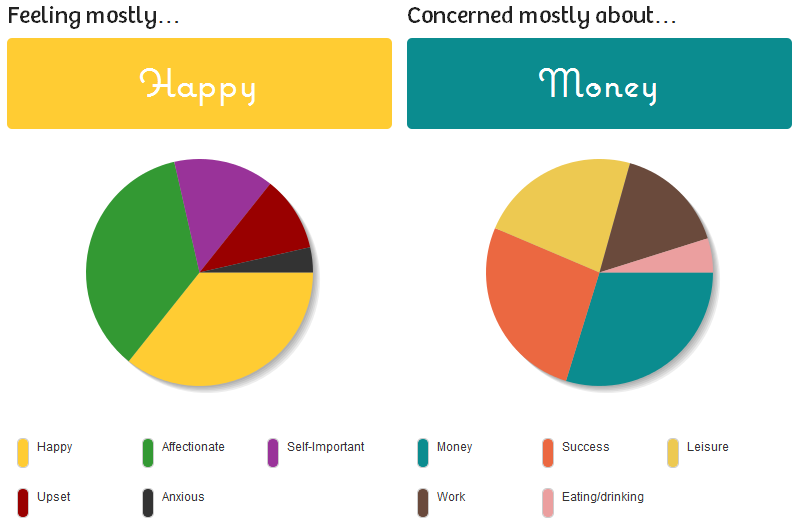
Another stat that I like is the mood. Often times when I am writing I just type whatever jumps into my head at that moment. When I finish I look at the stats and see that my mood was “upset”. What I didn’t realize was that I was ‘venting’ while I was writing. This picture shows the stats from the day I bought my new bike. I was really excited to get out to ride it and a little concerned about money as you can tell.
Metatags:
There is a feature that allows you to keep track of specific details of your day (sleep, stress, mood, etc.) You can look at how these have changed over time and also compare them to one another, for example, I like to look at the number of hours of sleep I got compared to level of stress that I am feeling that day.